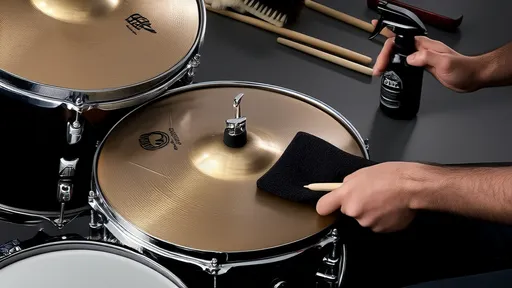
Keeping your cymbals clean is an essential part of drum maintenance that often gets overlooked. Many drummers focus on tuning their drums or replacing heads but forget that cymbals also require regular care to maintain their sound quality and appearance. Over time, dirt, fingerprints, and oxidation can build up, dulling the brilliance of your cymbals and even affecting their tone. Fortunately, cleaning your cymbals doesn’t have to be a daunting task—there are several effective methods to restore their shine and keep them sounding their best.
The first step in cleaning your cymbals is understanding what they’re made of. Most modern cymbals are crafted from bronze alloys, typically B20 (20% tin, 80% copper) or B8 (8% tin, 92% copper). These metals are prone to tarnishing when exposed to moisture, sweat, and air. While some drummers prefer the natural patina that develops over time, others want their cymbals to look as bright as the day they bought them. The approach you take will depend on your personal preference, but regardless, removing grime and fingerprints can help preserve the cymbal’s longevity.
One of the most debated topics among drummers is whether to use commercial cymbal cleaners or homemade solutions. Commercial cleaners are specifically formulated for cymbals and often do an excellent job of removing tarnish without being overly abrasive. Brands like Sabian, Zildjian, and Meinl offer their own cleaning products, which are generally safe for regular use. However, some drummers prefer DIY solutions, such as a mix of mild dish soap and warm water, to avoid harsh chemicals. If you go this route, be sure to rinse the cymbals thoroughly and dry them immediately to prevent water spots.
Another consideration is the type of cleaning tools you use. Avoid abrasive materials like steel wool or rough sponges, as they can scratch the surface of your cymbals. Instead, opt for soft microfiber cloths or cotton towels. For stubborn tarnish, some drummers use a small amount of baking soda mixed with water to create a gentle paste. Apply it with a soft cloth, rub in circular motions, and rinse well. This method can be particularly effective for older cymbals with heavy oxidation.
One often overlooked aspect of cymbal care is how you handle them during and after cleaning. Always hold cymbals by the edges or the bell to avoid transferring oils from your hands onto the freshly cleaned surface. If you’re cleaning multiple cymbals, lay them out on a soft towel to prevent them from scratching each other. Once cleaned, some drummers apply a thin layer of cymbal polish or wax to protect the surface and slow down future tarnishing. However, this is optional and depends on how often you’re willing to repeat the cleaning process.
For drummers who prefer a more natural approach, there’s the option of embracing the patina. Over time, cymbals develop a unique darkened finish that some believe enhances their sound, giving them a drier, more complex character. If you fall into this camp, you can still maintain your cymbals by wiping them down with a dry cloth after each use to remove sweat and dirt. This prevents corrosive buildup while allowing the natural aging process to occur. Some jazz and vintage drummers swear by this method, claiming it adds warmth and depth to their cymbals’ sound.
No matter which cleaning method you choose, consistency is key. Regular maintenance will keep your cymbals in top condition, whether you prefer them shiny or aged. The effort you put into caring for them will pay off in both their appearance and their sound. After all, cymbals are a significant investment, and keeping them clean ensures they’ll serve you well for years to come.

By /Aug 13, 2025
By /Aug 13, 2025

By /Aug 13, 2025

By /Aug 13, 2025

By /Aug 13, 2025

By /Aug 13, 2025

By /Aug 13, 2025

By /Aug 13, 2025
By /Aug 13, 2025

By /Aug 13, 2025

By /Aug 13, 2025

By /Aug 13, 2025

By /Aug 13, 2025

By /Aug 13, 2025

By /Aug 13, 2025

By /Aug 13, 2025

By /Aug 13, 2025

By /Aug 13, 2025

By /Aug 13, 2025

By /Aug 13, 2025